Tuesday, December 18, 2018

Microsoft ROADMAP available, have a look!

Finally Microsoft ROADMAP is available for lucky us! Depending on your your region, you’ll start to see Roadmap roll out worldwide to commercial customers.
For those who still haven't heard about the future of Project, here is the annoucement for Howard Crow and a video from Orlando MS Ignite about the upcoming new features.

I'll publish a more detailled post later on, but right now, I just want to share with you my first impression as activating and discovering Project ROADMAP.

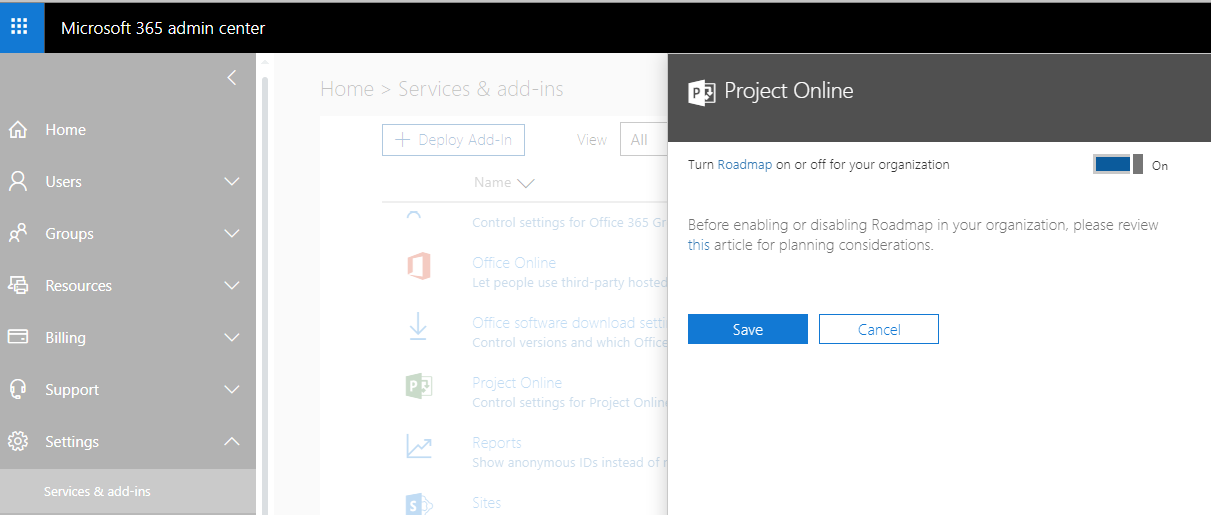
First you need to activate the Roadmap feature in the O365 Central Admin.


Then on the new Project Homepage, you'll find under "create new" button a "ROADMAP" item in addition to the existing project creation item.


After that, I add to wait for some time, maybe around 10 minutes, which I found to be quite long. Reading the message, the feature is getting setting up for the first time so it requires some time to compute. Note that I was using a demo tenant which might not be optimized like customer tenants. Note also that it is definitely a good news to finally have relevant and contextual message while you're waiting for an operation to be processed. It reminds me the new contextual message when you are publishing a project from PWA. Here is a reference.  

Once initiated, you'll start from an empty page proposing a timeline with a zoom and a member list.


When you create a first project (not sure if I should call it a "project"...), you specify a name, an owner (Anna) and you can connect it to an existing project from Project Online or to an Azure Board.

When trying to connect the new project to a Project Online project, you have to enter the PWA tenant URL then a project (once the URL is getting validated). 
Once the project selected, it seems like you're using FLOW to get updates to roadmap from Project Online.

You can then select a task:

And it will be added to the roadmap in the new project.


You can also add a key milestones.

You can also add members to the roadmap itself, but not specifically to the single project (line) inside the roadmap.

This was a quick review of the new roadmap feature. I can tell you that I'm pretty excited.
Do not hesitate to ask questions or to suggest improvments to Microsft through the UserVoice.


Share this article :

Sunday, November 18, 2018

Project Server 2019 Released

In a fast pace changing environment, Microsoft is continuously improving its Project Management platform via Project Online. While traditionally all enhancements are released in real time via Project Online, just one of the benefits of being in the cloud, Microsoft has released a bundled three-year snapshot of enhancements to its 2019 product for their loyal on-premises clients.


What’s new in Project Server 2019?

 Agile Delivery in your day to day Project Management Software

The new Project Server 2019 release introduces higher performance resulting from optimizations applied in the database layers.  Additional benefits include:

  Continuous PPM Innovation

Microsoft Project Server has been built on continuous PPM Innovation.  While Project Server 2019 is an on-premise version, you can connect to it from several desktop clients.
Share this article :

Friday, October 12, 2018

Indented Schedule Tasks in Power BI #Tips

The other day, one of my US colleague asked our internal community for help in displaying project tasks in a table. The tricky part is that he wanted to display the task names indented as Microsoft Project would do. One of my fellow colleague (Jean Lieverman) working on Project Online and Power BI replied with the simplest yet super clever solution. 
I was so excited to see such a clever call that I wanted to share!

Here is the result
As you can see, we have here a nice table with indented tasks based on the outline level of the tasks.

The awesomeness is not necessarily in the visual result but in the way it has been built To get to that result, Jean created a new column (right click on the tasks table and add column) called "Task Padded" with the following formula:
Task Padded = REPT ( "     ", Tasks[TaskOutlineLevel] ) & Tasks[Task Name]

The formula will add as much tabulations as the outline number which references the level of indentation. Use that new column in your matrix or table and you are all set!

I hope that will help some people who might want to achieve the same.
Special Credit to Jean 👍
Take care.
Share this article :

Thursday, September 27, 2018

Guest on Erik Van Hurck Blog about Project User Voice

I've been invited by Erik van Hurck to co-author a post on his blog. Erik has been awarded MVP Project for the first time this year. It is well deserved and the entire MVP community has pushed hard on the MVP program to ensure Erik's application will be closely looked.


If you haven't yet visited Erik's blog, run! You'll find interesting, sharp, well documented articles on technical subjects, books reviews and even a Youtube channel. Erik has also a serie of posts about Project User Voice. I contributed to this last serie after Cindy Lewis and Prasanna Adavi, 2 fellow MVP.

I let you read more about Project User Voice which is an interesting way for final users, consultants, administrators to propose and vote for upcoming features. And Microsoft is actually considering the propositions and some of them have already been developed and deployed on Project Online.

My post is about the backup and restore feature, which has been removed from Project Online versions, but still there for on-premise versions. I explain in the post why it was useful, why it was probably removed from the online version and how would it look like.

Feel free to share, vote, comment, like!

Share this article :

Monday, July 2, 2018

Renewed as MVP Business Solutions/Project for the 5th time!

Short post, big news! I've been renewed for the 5th time as MVP Project (Business Solutions). You might have noticed that after a year of transition, from now all MVPs will be renewed on July 1st. I do hope this will give me the opportunity to go to the MVP Summit, to finally meet my fellow colleagues I'm talking with since 2014 through email.


Share this article :

Tuesday, June 19, 2018

#PVC18 Recordings : Benefits Management in Project Server and Project Online

Hi everyone, I am pretty excited to share with you the recording of my session at the #PVC18. click on the link below to watch the full session. 

  Would you have any questions, do not hesitate to contact me via the comment box.

I would like to thank the organisers of the Project Virtual Conference and would like to share with you some sessions I found interesting:

Getting Started with Project Online and Power Apps


Personalized Project Management through Project Online, Bots and Artificial Intelligence


Microsoft Project and Planner: how to be agile using microsoft tools


10 Tips for Scheduling Success 


Data Science meets PM: Leveraging Advanced Analytics and Machine Learning for Project Management


How a Digital Transformation changes your Project Portfolio Management approach


A Practical Roadmap for Implementing Resource Management Using Microsoft Project Online


Using Microsoft Project to Manage Risk Reserves, Contingency Plans, and Risk Mitigation


You can find the whole list of recordings here 

Hope you will learn a lot from all the valuable sessions.

See you soon for a new post
Share this article :

Wednesday, May 30, 2018

#PVC18 - Benefits Management in Project Online and Project Server

Hi All, 

I will be presenting at the Project Virtual Conference.
Register to join me and other great speakers on that 24 Hour conference around Project Management
Timing for my session is below:

Talk to you soon.
Share this article :

Wednesday, February 7, 2018

[Project Online & Flow] How to send an email when a project is created?

Obviously, I get excited when I see that I can answer a business need which I couldn't answer before, due to my tragic lack of development skills... So this post is another one in the series of "nice features you can easily and quickly implement without a single line of code"

I am currently working with a customer who manages opportunities in Project Online. Sales persons create opportunities as projects in Project Online in order to prioritize them and see how they fit in the portfolio, in terms of cost and capacity. So far so good... The thing is opportunities must be qualified by the engineering department once created by the sales. Engineering department would like to know when an opportunity is created. So our objectives is quite clear: how to send an email as soon as a project is created? More than that: how to automate this process. We are here in the RPA field (Robot Process Automation). 2 years ago, it would have required custom developments, probably using Sharepoint Designer, Nintex, Visual Studio. So spending time and money to write specifications, code, test, integrate, deploy, manage evolutions... Now, I tell you, Office 365 can give you the ability to set up this business process in 5 minutes using MICROSOFT FLOW. Let's see how!

Basically Flow allows you creating connectors between applications, Microsoft apps but also an entire set of third-party apps. You need to fill in a Sharepoint list when you receive a Tweet? Use Flow! You need to store attachments in OneDrive when you receive an email from a specific person? Use Flow! I think you get it... 

First ensure that Flow has been activated as a service in your O365 domain. Then access Flow home page. You'll a huge number to predefined connectors. The community is incredibly active of Flow and you'll get more and more connectors over the years.
Available Flow connectors

I apologize in advance, my tenant is in French so all captures are in French. But I guess everyone will get the big picture. Once logged, you can pick up an existing connector, which works more or less like a template. I decided for my example to start from scratch, creating a brand-new connector.
New connector creation
Select the first action (trigger). If you just type PROJECT in the search bar, Flow will propose you a set of possible triggers using Project Online. I'll pick up the trigger "when a project is created".
Connector trigger

Then you'll be asked to enter you PWA tenant URL.

Enter your tenant URL

You have now to search for the appropriate application for the action. I'll pick up "O365 Outlook - Send an email".
Choose the application for the action

You can see that it is quite straight forward once you have selected the app. You just select who should receive the email, the object, the body, using Project Online dynamic content. In my case, I send the email to a specific person, but it could be to the creator for example.

Action settings
Save it and that's it! Create a new project and you'll receive the email.
Email recieved after project creation

Then you can navigate in the Flow interface to see what options you get, such as saving the connector as a template, exporting it, etc...
Connector options
Note that you can also do some analytics on your connector: when has it been triggered, how many times, success, failure, etc...
Connector analytics

I also tried to add a condition, because you might want to filter on a specific project type, owner, ID, dates, etc...
Connector with a condition

I just presented this morning a webinar on Project Online and how it interacts with the O365 bricks, and this is the perfect illustration. The paradigm has changed. For business processes such as my simple example, the O365 suite offers to the organizations an incredible time-to-market and sustainability.


Share this article :

Monday, January 29, 2018

How to display phases and milestones in the Project Center?

The Project Center is still after many years a central point when working with Project Server and Project Online. With the introduction of Business Intelligence tools such as PowerBI, SSRS, Excel Service, our customers have become more and more demanding in visualization capabilities. Especially in the Project Center which proposes a synthetic view of your projects portfolios, directly connected to the project details. For example, we always try to push our customer to stick to the project management best practices, meaning following a set of predefined phases. 
Project Center view
That being said, the project center core almost hasn't changed since Project Server 2002, which limited capabilities of customizations. I'll show you that you can anyway use those limited capabilities to display in the Gantt chart project phases and milestones.

Before starting, I would like to give credits to Erik Van Hurck who wrote an excellent post about this same subject. I'll start from that, give some ideas to go further and include the milestones in the approach.

1-Configure a custom Gantt chart
Oddly, you'll not use enterprise custom fields which are quite the first step of a Project Online configuration. The corner stone of this approach is to use CUSTOM dates. In the PWA Server Settings, go to the "Gantt chart formats" and choose a custom format such as Gantt1 to customize it, eventually rename it. You can specify a visualization for each phase using custom start and finish dates. In my example I have 9 phases (I know, it is too many...) and a key milestone. Note the configuration for the milestone where you configure the beginning and finish of the shape, but not the shape itself. 
Custom Gantt chart customization

I usually also remove the project summary task so you won't have a summary task bar above the phases.


2-Configure the custom Project Center view

You can now create a new view from scratch or by copying an existing one. You'll have to use your Gantt1 custom format.
Custom view configuration using the custom Gantt


3-Configure the custom start and finish dates
The tricky part is that even if you use custom durations in the custom Gantt format, you must not use the custom durations in the projects. The Gantt format custom durations in PWA are actually not linked to the project custom durations, but are the difference between custom finish and custom start dates. Thus in MS Project, just configure your custom start and finishd dates. You need to set up a trigger to copy dates into custom dates. My advice is to use a task custom field with a drop-down list to copy start/finish dates into the custom n start/finish dates. Doing this, you get rid of typos. 

Local custom field configuration
Note that (thanks Erik for the tip) in the formula for the start dates, you have to set a far far away start date if the condition is not fulfilled, with a rollup at minimum. On the contrary for the finish dates, set an oldest date in case the condition is not fulfilled, with a rollup at maximum. Doing this, you're sure that you'll get the earliest start date and the latest finish date.

Note also that since there are local custom fields, you have 2 solutions to make those fields available for users (even if they don't have to update those calcualted field) :
- Add them to the Enterprise Global using the organizer.
- Add them to your WBS associated with your EPT (my choice).

To go further, you should define a WBS with your phases and this "phase" custom field already pre-configured. 

Once done, this is all automatic for the users, as soon as they publish their projects once you did the configuration. They just need to be careful to correctly enter the phase custom field (task level) in the project. The dates should be copied in the custom dates, then the Gantt chart will use them in the Project Center. Note my key milestone shown as a red star.
Custom Project Center view with phases and key milestones

Limitations
You have only 10 custom durations, meaning that you can configure up to 10 phases/milestones. I've tried to simply use a start or finish date for the milestones, so I can configure 2 milestones on a single custom duration, but so far no luck. I think this is because it needs a start and a finish date to calculate the custom duration, even if it is a milestone.
The other limitation is not really a limitation, at least in my use case. Since you're using local custom fields, they are not in the reporting tables so you cannot use them in your PowerBI reports. But as I advice to use a "phase" task custom field in your WBS, this would be the one used in your reporting.

Share this article :

Monday, January 8, 2018

LAUNCHED - OData Improvements to Include Timestamps for Project Entities


Last year, I was excited about a roadmap feature that had been updated on the Office 365 Roadmap. I talked about it here.

Well, here is an even more exciting update as it has been released the 4th of January. I haven't seen any official blogs yet so I had a bit of an investigation to understand what changed.
Overall, Microsoft has kindly provided the modified information to the following tables;


DataSet
Added Field
Comment
Assignment Baseline Timephased
AssignmentBaselineModifiedDate
Date of the modified baseline (date it has been published)
Assignment Timephased
AssignmentModifiedDate
Date the Assignment has been last modified
Engagement Timephased
EngagementModifiedDate
Date the Engagement has been last modified
Engagements
EngagementModifiedDate
Date the Engagement has been last modified
Project Baselines
ProjectBaselineModifiedDate
Publish date of the last modified baselines
Resource Demand Timephased
ResourceDemandModifiedDate
Date of the Resource Demande last modified
Resource Timephased
ResourceModifiedDate
Date of the Resource last modified
Task Baselines
TaskBaselineModifiedDate
Date of the modified baseline (date it has been published)
Task Baselines Timephased
TaskBaselineModifiedDate
Date of the modified baseline (date it has been published)
Task Timephased
TaskModifiedDate
Date of the task last modified
TimesheetLine Actual
TimesheetLineModifiedDate
Date of the timesheet line last modified

That is really great addition. For example, as Guillaume was stating in his comment from the previous blog, we can now track changes in the baselines and validate when a baseline has been defined.
Therefore, we can easily add a bit of smart in the queries to download only if a data has been modified.
Here is a quick example of a Power Bi report using the Baseline Modification Data to highlight tasks baselined after the project has been baselined.

One thing I am not so happy about is that I was expecting to have a trending capability with some historical data stored somewhere. I guess I was too demanding. The new fields are providing with a last modified date at a lower level than the Project level but are not recording the historical values of the fields before they changed. Something that Microsoft is hopefully considering soon. you can vote here: https://microsoftproject.uservoice.com/forums/218133-microsoft-project/suggestions/15300603-implement-versioning-in-project-online.

Tell me what you think about that added information and what usage you may do of it!

Share this article :